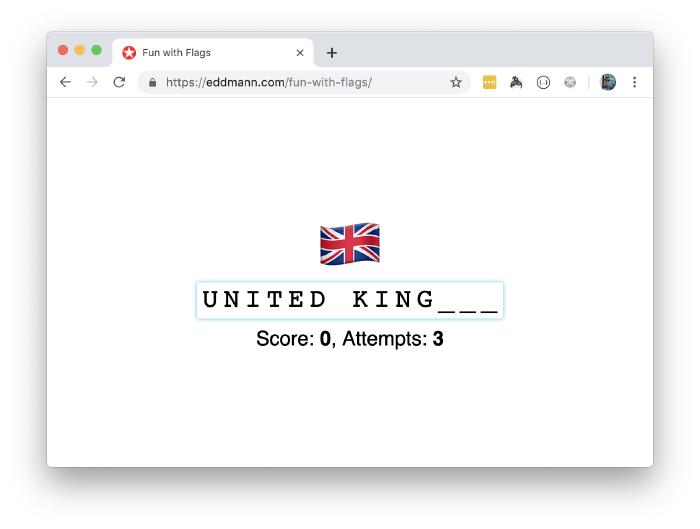
Building a Flag Guessing Game using React Hooks
Since React Hooks were announced last autumn, I’ve been looking at ways to experiment with them in a couple of small side-projects. In this post we will create a simple flag guessing game (called Fun with Flags) leveraging Create React App, Styled Components and React Hooks. Along the way we will highlight use-cases for several different hooks such as State, Effect and Memoization. Finally, we will automate the process of publishing the compiled game to GitHub Pages.

Setup
The first step we need to take is to initialise the project, including the required styled-components dependency.
$ yarn create react-app fun-with-flags
$ cd fun-with-flags && yarn add styled-components
The game will take advantage of the flag emojis, which we store in src/flags.js along with their associated name.
If you are following along with this post, you can find the completed listing within the GitHub repository.
export default [
  {
    emoji: '🇬🇧',
    name: 'United Kingdom',
  },
  // ...
];
The Answer Box
It is good practise to decompose an application into smaller, high cohesion units - of which we can then compose together to provide the desired behaviour.
With this in mind, we will begin by focusing our attention on the special input field (located within src/AnswerBox.js) that will be used to manage the user’s entered answer.
We start off by defining some key styled building blocks used to create the overall AnswerBox.
import React, { useState, useEffect, useMemo } from 'react';
import styled from 'styled-components';

const Form = styled.form`
  margin-bottom: 1em;
`;

const Placeholder = styled.span`
  font-family: courier;
  padding: 0 0 0.2em 0.2em;
  font-size: 2em;
  letter-spacing: 0.2em;
`;

const HiddenInput = styled.input`
  opacity: 0;
  position: absolute;
  width: 100%;
  top: 0;
  right: 0;
  bottom: 0;
  left: 0;
  caret-color: transparent;
  &:focus + ${Placeholder} {
    box-shadow: 0 0 5px rgba(81, 203, 238, 1);
  }
`;
The input will be presented to the user in placeholder form, using a _ to indicate the presence of a character and including any word separators.
To achieve this we will use a hidden text input within a form, displaying the resulting input value within a styled span element presented to the user.
In doing this we can still take advantage of the form lifecycle events (i.e. onChange and onSubmit).
Thank you to Sebastian Sim for this idea!
const toPlaceholder = (value, answer) =>
  [...value].reduce((placeholder, char) => {
    return placeholder.replace('_', char);
  }, answer.replace(/[^\s]/g, '_'));

const normalise = value => value.toUpperCase().replace(/[^A-Z]/g, '');

export default ({ answer, onCorrect, onIncorrect, ...props }) => {
  const [value, setValue] = useState('');

  useEffect(() => setValue(''), [answer]);

  const handleChange = event => {
    setValue(normalise(event.target.value));
  };

  const handleSubmit = event => {
    event.preventDefault();

    value === normalise(answer) ? onCorrect() : onIncorrect();
    setValue('');
    return;
  };

  const placeholder = useMemo(() => toPlaceholder(value, answer), [value, answer]);

  const maxLength = useMemo(() => normalise(answer).length, [answer]);

  return (
    <Form onSubmit={handleSubmit}>
      <HiddenInput onChange={handleChange} value={value} maxLength={maxLength} autoFocus />
      <Placeholder>{placeholder}</Placeholder>
    </Form>
  );
};
Looking at the implementation above, you can see that we manage the user’s answer with a State hook.
This value is reset if the desired answer changes (i.e. a new flag is displayed) using an Effect hook.
From here, both calculating the actual answer’s length and generating the placeholder for the current state are referentially transparent operations, and as such can be cached using the Memoization hook.
Finally, when the user submits the form (i.e. hits enter), we check the value and, based on its correctness, invoke the provided onCorrect/onIncorrect callbacks.
Managing the Game
With the AnswerBox now implemented, we can move on to developing the encompassing Game management component within src/Game.js.
In a similar manner to before, we define several styled building blocks that will be used to present the overall game to the user.
import React, { useState, useEffect } from 'react';
import styled from 'styled-components';
import AnswerBox from './AnswerBox';

const CentreWrapper = styled.div`
  margin: 0;
  padding: 0;
  overflow: hidden;
  position: absolute;
  width: 100%;
  height: 100%;
  display: flex;
  justify-content: center;
  align-items: center;
  flex-direction: column;
  font-family: sans-serif;
`;

const Flag = styled(({ flag, ...props }) => <div {...props}>{flag}</div>)`
  font-size: 5em;
  line-height: 1em;
  padding: 0;
  margin: 0;
`;

const Results = styled(({ score, attempts, ...props }) => (
  <div {...props}>
    Score: <span>{score}</span>, Attempts: <span>{attempts}</span>
  </div>
))`
  display: block;
  font-size: 1.5em;
  span {
    font-weight: bold;
  }
`;
This component manages the current score, attempts and flag ordering - delegating to the AnswerBox for presenting and verifying the answer input.
const shuffle = arr => [...arr].sort(() => 0.5 - Math.random());

export default props => {
  const [flags, setFlags] = useState(() => shuffle(props.flags));
  const [score, setScore] = useState(0);
  const [attempts, setAttempts] = useState(props.attempts);

  const nextFlag = () => {
    setFlags(flags.length > 1 ? flags.slice(1) : shuffle(props.flags));
    setAttempts(props.attempts);
  };

  const onCorrect = () => {
    setScore(score + 1);
    nextFlag();
  };

  const onIncorrect = () => {
    if (attempts > 1) {
      setAttempts(attempts - 1);
      return;
    }

    setScore(Math.max(0, score - 1));
    nextFlag();
  };

  const [{ emoji, name }] = flags;

  return (
    <CentreWrapper>
      <Flag flag={emoji} />
      <AnswerBox answer={name} onCorrect={onCorrect} onIncorrect={onIncorrect} />
      <Results score={score} attempts={attempts} />
    </CentreWrapper>
  );
};
When the game is started (or all flags are exhausted) we reset the flags state to a shuffled ordering of the provided listing.
In the case of the flags initial state, we only wish to shuffle the provided flags once at the beginning (not wastefully on each render).
To do this, we wrap the behaviour in a function which ensures that the operation is only called when required during the component’s lifecycle.
From here, based on the decision made within the AnswerBox component, we update the user’s attempts and score accordingly.
Finally, we are able to compose all these pieces together into a src/index.js entry point.
import React from 'react';
import ReactDOM from 'react-dom';
import Game from './Game';
import flags from './flags';

ReactDOM.render(<Game flags={flags} attempts={3} />, document.getElementById('root'));
We can then run yarn start to experiment with the game locally 🎉.
Publishing to GitHub Pages
Now that we are happy with the game locally, the next step is to share it with the masses 😎.
This can be easily achieved via compiling a production build locally and publishing it to GitHub Pages.
We can even automate this process by adding the following gh-pages dependency.
$ yarn add gh-pages
With this dependency added, include the following scripts actions into the package.json file.
{
  "scripts": {
    "predeploy": "yarn build",
    "deploy": "gh-pages -d build"
  }
}
Now, whenever you wish to publish a new version of the game, simply run the following command and gh-pages will build and commit a new version to the gh-pages branch.
$ yarn deploy
This in turn will publish a new static version of the game to GitHub Pages, accessible in my case via https://eddmann.github.io/fun-with-flags and, as I have my apex DNS record pointing to GitHub, at https://eddmann.com/fun-with-flags.