Deploying our Wedding Website onto a Raspberry Pi Kubernetes Cluster using K3s and Helm
Over the past couple of weeks, I have been considering how feasible it would be to deploy the wedding website I released earlier this year on Kubernetes using a Raspberry Pi cluster. After a little research, this past bank holiday weekend, I set myself the goal of building and deploying the web application on Kubernetes by the end of the Monday bank holiday! In this post, I would like to discuss how I went about achieving this goal and what I learnt in the process.
Constructing the Cluster
Thanks to a previous project, I already had several Raspberry Pis gathering dust on the shelf, so I did not have to invest in any additional hardware (which was fortunate due to the shortages at this time). As such, for the cluster build, I opted to use 1x Raspberry Pi 4 Model B (4GB RAM) as my server (master) node and 2x Raspberry Pi 3 Model B+ as agent (worker) nodes. Having seen several Raspberry Pi cluster builds online, mine is by no means the most impressive, but it does provide sufficient distributed compute to explore many features Kubernetes has to offer.
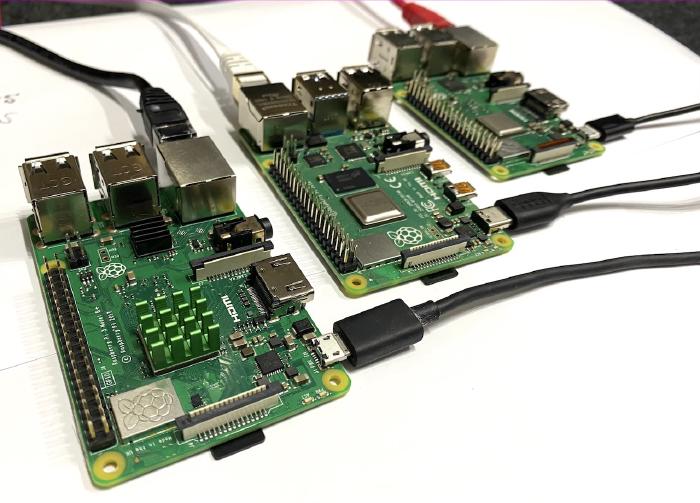
In a previous revision of the website, I had explored using a single-master node Kubernetes setup, which required me to bootstrap and configure many aspects of the cluster. Fortunately, since this work, K3s has joined the party, providing a Kubernetes offering with a small resource footprint, ideal for low-powered devices such as the Raspberry Pi. For a project such as mine, this was an ideal use case, allowing me to concentrate efforts on the application deployment itself.
Configuring the Nodes
To flash the desired OS to the Raspberry Pi micro-SD cards, I opted to use the Raspberry Pi Imager. On top of this, I also found a tool called k3sup, which is a small binary executable you can download on your host machine to assist in configuring each K3s node via SSH.
Each Raspberry Pi associated with the cluster was configured using the following procedure. Note: These instructions are correct as of the time of writing.
- Open the Raspberry Pi Imager application and select Raspberry Pi OS Lite (64-bit, Debian Bullseye). Update the desired hostname/SSH credentials, and then flash the image to the micro-SD card.
- Boot up the Pi.
- Copy your host SSH key to the Pi by running:
ssh-copy-id pi@HOSTNAME.local - [On the Pi] Update the Pi’s static IP address defined within
/etc/dhcpcd.confby appending the following configuration:interface eth0 static ip_address={DESIRED_PI_IP}/24 static routers={ROUTER_IP} static domain_name_servers={DNS_IP} - [On the Pi] To enable the required kernel container functionality, append the following to the
/boot/cmdline.txtfile line:cgroup_enable=cpuset cgroup_memory=1 cgroup_enable=memory - [On the Pi] Reboot the Pi.
- Set up the server node using the k3sup tool by executing:
k3sup install --ip {SERVER_IP} --user piUpon successful installation, you will be presented with akubeconfigfile on your host machine, which can be used to authenticate and interact with your newly formed cluster. - Once the server has been configured, you can follow the above procedure again to flash and configure the desired agent nodes.
However, instead of installing the server using the k3sup tool, you will join the existing cluster by executing:
k3sup join --ip {AGENT_IP} --server-ip {SERVER_IP} --user pi
Once all the Raspberry Pi’s had joined the cluster I was ready to begin work on making the required modifications to the application. Using kubectl I could now access the built cluster like so.
> kubectl get nodes -o wide

NAME           STATUS   ROLES                  AGE    VERSION        INTERNAL-IP    OS-IMAGE
kube-server    Ready    control-plane,master   3d5h   v1.22.7+k3s1   192.168.1.40   Debian GNU/Linux 11 (bullseye)
kube-agent-1   Ready    <none>                 3d5h   v1.22.7+k3s1   192.168.1.41   Debian GNU/Linux 11 (bullseye)
kube-agent-2   Ready    <none>                 3d5h   v1.22.7+k3s1   192.168.1.42   Debian GNU/Linux 11 (bullseye)
Modifying the Web Application
The original web application had been developed to be run within an FaaS environment, more specifically AWS Lambda. I wanted to refrain from having to make any unnecessary changes to the underlying application to speed up project progress. My initial task was to develop the containerised environment within which the PHP application could run.
I opted to use an Alpine-based image, which took advantage of the great docker-php-extension-installer to include the desired PHP extensions. I also decided against splitting up the HTTP proxy and PHP-FPM responsibilities for this project and instead baked Caddy into the single image. To handle the different responsibilities required of the application, I included a custom Docker entrypoint script, which allowed the single built image to either handle web traffic, become a long-polling asynchronous worker, or apply outstanding database migrations. This is by no means best practice, but it was a trade-off to reach the desired project outcome within the deadline.
Using a multi-stage Docker build allowed me to pull in a Node image to handle compiling the application assets and include them in the final deliverable. This image was not intended to be used in a development setting, so other tooling present within the Lambda-focused environment was intentionally omitted.
With the target platform being a Raspberry Pi, I had to ensure that the image being built supported the ARM64 architecture. To achieve this, I used Docker Buildx, which allowed me to build (although rather slowly on my MacBook Pro) two platform-specific images. These were then pushed to my container registry of choice, GitHub Container Registry (GHCR).
docker buildx build \
  --platform linux/amd64,linux/arm64 \
  --tag ghcr.io/eddmann/our-wedding-website-kube:latest \
  --file docker/Dockerfile \
  --target prod \
  --push .
This allowed me to experiment with the image on my x86 64-bit host machine, as well as on the Raspberry Pi itself. With the images now built and shipped to GHCR, I then developed a Docker Compose environment which could be run locally to replicate the desired Kubernetes deployment. This environment included the single built image being used in the different desired roles: as a web application, a worker, and a one-off database migration execution.
Within the AWS Lambda-based environment, I had used DynamoDB to store the web application sessions and SQS to handle the worker queue. For this deployment, I opted instead to use Redis for the web application session management and RabbitMQ to handle the asynchronous message bus. Fortunately, I was able to keep the same local setup used for PostgreSQL, which was used for persistent data storage.
Thanks to following the practices outlined in the twelve-factor app, there was only a single additional Symfony configuration file that was required to be added to the final built image. All other configuration changes were achievable via outside control, using exposed environment variables.
With the application now configured and running locally using Docker Compose, it was time to implement this environment within Kubernetes using a Helm chart.
Building and Deploying the Helm Chart
I was very fortunate to be able to borrow a lot of the resource definitions I had written for the previous web application’s Helm chart. To keep this application isolated from other services on the cluster, I created and used a specific namespace. All secrets were stored as Kubernetes secret resources and injected in as environment variables to the relevant pod containers. As the application image was stored privately within GHCR, I was required to provide the GitHub personal access token capable of pulling that image. I opted to let kubectl create the underlying resource, which was preferable as this process has several steps.
kubectl create secret docker-registry github \
  --namespace our-wedding-website \
  --docker-server=https://ghcr.io \
  --docker-username=irrelevant-user \
  --docker-password=#PAT#
As this was an experimental project, I opted to keep PostgreSQL confined to a single replica stateful set. This allowed me to persist the data across node restarts but did not cater for node failure and database failover. I also opted to run single replica instances of the RabbitMQ and Redis headless services. Again, this decision was made out of ease as opposed to best practice.
The database migration was mapped to a Kubernetes job, which included the Helm revision number in its name, resulting in a new job being triggered upon each Helm deployment. During my research on handling database migrations, I came across a method to ensure that the pending web/worker services would not be added to the service rotation until the dependent migration job had succeeded. This was achieved by way of an Init Container attached to the web/worker deployment definitions, which waited for the desired job to be completed before starting the actual pod containers. Unfortunately, the Docker image in question did not support the ARM architecture, and as such, I opted to omit this addition in the interest of time.
Finally, the web application service was exposed via an Ingress resource using the pre-included Traefik HTTP proxy. I was now able to deploy the Helm chart to my Raspberry Pi cluster.
helm upgrade our-wedding-website ./helm \
  --install \
  --namespace our-wedding-website \
  --values ./helm/values.yaml \
  --values ./helm/secrets.yaml
In doing so, I was able to access the web application by proxying into the service (via kubectl port-forward) or setting one of the Raspberry Pi local network IPs as the resolved hostname destination within my /etc/hosts 🎉.
> kubectl get pods -n our-wedding-website

NAME                        READY   STATUS      RESTARTS      AGE
rabbitmq-7f69f76c99-p7m2j   1/1     Running     1 (18m ago)   1h
postgres-0                  1/1     Running     1 (18m ago)   1h
redis-657cfb4cbf-nffct      1/1     Running     1 (18m ago)   1h
web-7d589fcc5b-6zdcq        1/1     Running     1 (18m ago)   1h
migrate-db-11--1-v5gdh      0/1     Completed   0             1h
worker-65f8548ff-vpklh      1/1     Running     2 (10m ago)   1h
I could also now experiment with scaling out the web and worker services via kubectl.
> kubectl scale --replicas=3 deployment/web
> kubectl scale --replicas=3 deployment/worker
> kubectl get pods -n our-wedding-website -o wide

NAME                        READY   STATUS      RESTARTS       AGE    IP            NODE
rabbitmq-7f69f76c99-p7m2j   1/1     Running     1 (18m ago)    1h     10.42.1.46    kube-agent-1
postgres-0                  1/1     Running     1 (18m ago)    1h     10.42.0.132   kube-server
redis-657cfb4cbf-nffct      1/1     Running     1 (18m ago)    1h     10.42.0.134   kube-server
web-7d589fcc5b-6zdcq        1/1     Running     0              1h     10.42.0.127   kube-server
migrate-db-11--1-v5gdh      0/1     Completed   0              1h     10.42.0.139   kube-server
worker-65f8548ff-vpklh      1/1     Running     15 (53m ago)   1h     10.42.0.128   kube-server
worker-65f8548ff-2mwcz      1/1     Running     0              14s    10.42.2.56    kube-agent-2
worker-65f8548ff-tm4sf      1/1     Running     0              14s    10.42.2.57    kube-agent-2
web-7d589fcc5b-qwzv8        1/1     Running     0              14s    10.42.0.140   kube-server
web-7d589fcc5b-m2fhx        1/1     Running     0              14s    10.42.2.55    kube-agent-2
Accessing the Website from the Internet
Being able to access and interact with the website on my local network was pretty cool. However, the end goal of this long weekend was to be able to access the web application on the public internet, in a similar fashion to the AWS Lambda deployment. The easiest means of achieving this would be to expose the port on my home router and port-forward traffic to one of my Raspberry Pi cluster nodes. Sadly, I do not have a static IP address provided by my ISP and also do not like the sound of exposing ports to the public internet. As such, I had to find another means of exposing the service to the public internet.
After a little research, I was pleasantly surprised to find a project called Inlets, which did exactly what I was looking for! Better still, it included a Kubernetes operator that handled provisioning the required Kubernetes resources. The project itself creates a VPS instance (with a static IP) on your desired cloud provider (i.e. EC2 in the case of AWS) and uses this as an exit node for traffic that is securely tunnelled between your local Kubernetes cluster and requests coming in through the public VPS. This enables you to access the Ingress service (ports 80 and 443) via the VPS IP address, without the need to expose any local router ports. The catch, however, was that without a paid-for plan, you were only capable of creating insecure HTTP (port 80) connections 😢. I really wanted to replicate the same HTTPS experience that the AWS Lambda environment had. I did look at the pricing options, but as this was a small experimental project that was going to be torn down in the near future, I did not feel I could justify the cost.
Creating My Own Tunnel
It was back to the drawing board… but this time, the idea of setting up some form of tunnel between my local Kubernetes cluster and a remote VPS stuck in my head.
With this idea, I experimented with setting up a reverse SSH tunnel between one of the nodes’ Ingress-exposed ports (80 and 443) and an EC2 instance.
Due to these ports being so low, I was unfortunately required to authenticate with the EC2 instance (exit node) as the root user 😬.
Having configured the following SSH daemon configuration options, GatewayPorts yes and PermitRootLogin yes, I was able to initiate the reverse tunnel in the background as follows.
ssh -R80:127.0.0.1:80 -R443:127.0.0.1:443 -N root@EXIT_NODE_IP -i {KEY} &
With this running in the background, I was now able to update the desired domain’s DNS record to point to the EC2 instance’s public IP address and access the web application via both HTTP and HTTPS. There is, of course, a huge caveat to using this approach, as it again introduced another single point of failure. By design within Kubernetes, you can access the exposed Ingress service using any of the provided node IPs. With this approach, we are limiting entry to just one. Again, as this was just an experimental project, this approach would suffice.
When visiting the web application via HTTPS, however, the response returned a self-signed certificate that Traefik had created. We were now capable of changing that!
Issuing SSL Certificates using cert-manager
With public access now available, I could configure cert-manager within my Kubernetes cluster to handle issuing SSL certificates via Let’s Encrypt. This tool not only assists in issuing the SSL certificates, but it also provides a means of automatically renewing certificates that are close to expiry. Using the installation instructions present on their website, I was able to set up cert-manager and the associated staging/production Let’s Encrypt ClusterIssuer resources. I was then able to add the required annotations to the Ingress resource, instructing cert-manager to issue and use a Let’s Encrypt certificate. I initially used the staging Let’s Encrypt issuer to ensure that my configuration was correct before moving on to generating the production-ready certificate. With the certificate in place, I could now access the web application on the public internet via HTTPS.
Conclusion
By the end of the long weekend, the web application was finally live! 🎉
I am very happy with the resulting Kubernetes-based deployment. Getting the chance to construct and configure the Kubernetes cluster itself was a lot of fun and was made easier thanks to K3s and the k3sup tool. Being able to keep so much of the original application intact and only apply additive changes was a great experience. It highlighted the importance of the twelve-factor app methodology and the use of environment variables. Getting hands-on experience using Kubernetes resources and tools such as Helm and cert-manager was invaluable. Finally, being able to produce a deliverable on par with what is currently running in the AWS Lambda environment was very rewarding.
I hope this has piqued your interest in trying to set up and configure your own Kubernetes cluster!